
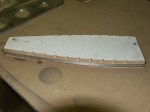
I started today by adding the fluting notches to my rib forming blocks. These were done using a rasp type bit in the drill press. I simply held the forming block at the appropriate angle and pushed it against the rasp bit. The finished notch works well.
Forming Rear Ribs
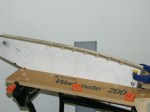
With the forming blocks ready to go I started to form the rear ribs. After clamping them between the forming blocks and putting the assembly into my workmate, its fairly easy to hammer over the flange. Working slowly so as not to stretch the aluminum too much I can almost get the flange completely formed before pushing material into the fluting notches. For the flutes I use a 1/2" drive socket extension and the same forming hammer. The flutes look very nice and the ribs come out almost flat.


Finished Deburring the Rear Ribs
Over the last two days I’ve managed to get in the time to complete the deburring of the main or rear ribs. I also used some acetone to remove the glue left behind by the tape that was used to secure the roll of aluminum when I brought it home in my van. I’ll have to remember next time to only allow the supplier to use stretch wrap and not use the tape. It looks like I should be ready to get to forming next.
Wing Ribs
Over the last few days I have continued deburring the Wing Ribs. I got to the point where I had 10 left to deburr. At this point I decided I needed to make the -01 through -05 wing ribs. I marked each according to the plans. Drilled a new 1/4" relief hole and then made the extra cutout using the Andy Snips. I now have 10 ribs ready to be deburred.
Duburring
Four more ribs completed. The total now stands at Eleven. Only 15 more to go.
More Deburring
It’s quite cold out today (-17C) but I managed to get the garage up to 10. I deburred some more ribs today. I think I finally have it figured out. I’m using a deburring tool for the large lightening holes then a scotch brite pad to finish the holes. Next I use the scotch brite wheel in the grinder for the edges of the rib. It does a wonderful and quick job. Finally, a scotch brite pad just to finish things up. 7 ribs completely deburred, 19 more to go.
Deburring Rear Ribs
It has warmed up a bit outside so I can now get the heat up in the garage. I started deburring rear ribs tonight. It seems to be a very slow process. I think its time to purchase a scotch brite wheel.
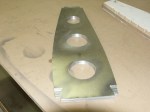
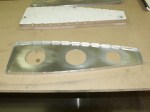
Finished Lightening Holes
I finished cutting all of the 4" diameter lightening holes in the rear ribs today. That’s 52 four inch holes. Wow. It seems like your forever putting aluminum under the drill. Not much to take pictures of so I didn’t. Next I need to debur, trim the various ribs that have the larger relief and then I can get on with the forming. Oh yea, I also need to clean up some of the tape glue left over from the packing of the aluminum when I brought it home. Acetone seems to work best as long as I have my mask on.
Cutting Lightening Holes in Rear Ribs
I cut all of the 3" lightening holes in the rear ribs and started to cut the 4" holes.
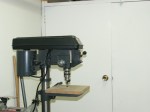
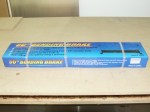
30 Inch Bending Brake Purchase
Today I purchase a 30" bending brake. The local Princess Auto store has these for $79.00 dollars (Canadian). I picked this one up in Hamilton, Ontario. It looks pretty sturdy and should do the job for all of the small parts. I plan on purchasing the pre-bent metal kit so I only need the brake for small parts. It was made in China but the quality is reasonable.


You must be logged in to post a comment.