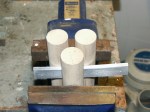
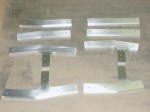
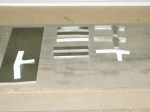
I used the rod or pole bender in my vice to put the bends in the -07 splice plates today. I ended up with a little orange peel which I cleanup using a scotch brite pad. I am going to need to get some more dowels or buy a couple pieces of steel rod. I find that the hard wood doesn’t last very long in the vise. I had to cut some new pieces for the second splice plate as the first pieces were becoming flat.
Upper and Lower Vertical Splice Plates
I cleaned up the -05 and -07 splice plates today. I filed the edges and then sanded the edges. Next, I added the chamfers and pilot drilled all of the splice plates includeing the -04 and -06.
Right and Left Hand Upper Horizontal Splice Plate
Today I worked on the -04 splice plates. I used a file to clean up the edges after sanding. Then I sanded the edges to remove any remaining file marks. Finally, I finished the edges with a scotch brite pad.
More Work on the Splice Plates
I finished cutting out the -04 splice plates using the band saw. Next, I used the bench sander to clean-up the straight sides on each of the splice plates.
Lower Horizontal Splice Plates
Today I worked on the splice plates again. I used my bench sander and a sanding drum in the drill press to get the plates to the correct size. Next, a little filing to smooth out the ridges left by the bench sander. Finally, I finish sanded the parts and then used some scotch brite to polish them a bit. I still need to drill the holes, put on the chamfers and then bend the plates.
Creating Cad Templates
This morning I drew up 3 parts in AutoCAD. I needed templates for the upper and lower horizontal splice plate and the lower vertical splice plate. These were fairly easy to create in AutoCAD. I printed a hard copy, glued them to white bristol board and cut them out for templates
Making Splice Plates
This afternoon I worked on making the splice plates from aluminum plate. I traced out the templates and cut the parts using my bandsaw. The bench sander cleaned up the edges nicely. I still have alot of work to do on these parts and it will probably take several hours to get them ready for forming.
Main Spar Aft Strap
I finished cutting the strap to length then I marked the two slots. Using my bandsaw I cut out the two slots and then used a sanding drum in the drill press to clean up the ends of each slot. Next I used the vixen file to cleanup the slots. I sanded the slots using a piece of 220 grit aluminum oxide sandpaper wrapped around a 1/2 inch drive socket extension. I finished the part with scotch brite and then started to layout the pilot hole locations.
Aft Main Spar Strap
I finished the strap by marking and drilling the pilot holes.
Left Hand and Right Hand Upper Horizontal Splice
I cut, filed and sanded one blank. It’s now ready for drilling, chamfering and forming.


You must be logged in to post a comment.