
<p><b>Two days in a row!</b></p> <p>Today I began to look at the elevator. I started by digging out the box containing my formed metal and locating the root ribs. I checked the overlap on the front for the skins to be sure that the overlap was sufficient to allow for the correct drilling and edge distances. They both looked good.</p> <p>After looking at all of the ribs I had previously made I discovered that the root ribs were made from 0.025 material instead of 0.032. I proceeded to make new root ribs. I had the original templates so it was fairly easy. I just traced out the ribs, drilled the relief holes, cut out the ribs, and cleaned up the edges using a file, sandpaper and scotchbrite. Next, I marked the bend lines and formed the ribs.</p> <p>The next time out I’ll need to start trimming the skins.</p>
Finishing Up Rudder
It’s been a while since I made an entry in my builders log. Work has been very slow but I am trying to get back at things and get back to recording my work. Today I was working on my rudder. I spent time deburring the ribs for inside the rudder. I found that a tongue depressor wrapped in sand paper works well to break of the burr on the inside of the flanges. After getting everything deburred, I began the riveting process. I started by riveting in the center rib then the hinge. Next, I reveted the rudder drive horn assembly. I left the drive horn assembly and the top rib off so that this area could be inspected as part of my precover inspection.
Forward Spar Channel
Today I continued work on the forward spar channels. I lost my cut length for the channel so I had to recalculate it. Next I cut, trimed and formed the second channel. Finally I drilled both and then removed the protective plastic coating.
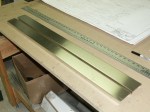
Main Spar Channel
I started making the main spar channels for the horizontal stabilizer. I located my last piece of Z03-02 channel then calculated the cut length and cut the channel. Again, I used a hack saw to start the cut on the web of the channel and then finished the cuts in the flanges with snips. I used my bench sander to clean up the ends. Next I trimed the end using right and left hand snips and filed the 1/8" radius. I finished the session by putting the 90 degree bend in the end of the channel.
This is a catch all entry.
Back at the begining of December I started working on the vertical stabilizer. I cut out the remaining parts from the formed metal kit. Next it drilled the necessary holes and colecoed it all together. Finally, yesterday I rivited the assembly together to make the first real airplane looking assembly.
Forward Spar Channel
Today I started working on the forward spar channels. After digging though my formed metal kit I located a 96" length of Z03-02 channel. I cut it to length using a hacksaw and snips and then trimmed the end in preparation for forming. Trimming the end involved using one of my small round files and a little sandpaper. The left and right handed snips come in handing working on this material. Next I formed the 68 degree angle on the end. I finished todays work by marking the piece for drilling. I also did some mock setup just to see how the part fits up.
More work on the parts for Elevator Horn Weldment
I bought a new band saw blade from a local vendor in the Brampton, ON area. They make blades to order ,so I purchased a 1/2" wide by 0.025" thick 14-16 variable pitch bi-metal blade. It seems to cut the 4130 plate fairly well but I’m having difficulting cutting tube. I think I’ll use a zip disk in a small angle grinder to cut the tube. My other thought for the tube is do put an abrasive disk in my power miter saw. In any case my bench sander works great to put the angle on the end of the tube. I cut out the two plates required for the elevator horn and I drilled the pilot holes in one. I also sanded the 20 degree angle into one end of a piece of tube. Working with the 4130 seems similar to working with the aluminum althought its a bit heavier and takes a little more force to get things cutting.
Drawings for Elevator Horn Weldment Parts
It’s been a while since I’ve had a chance to work on the plane. I have ordered and received almost all of the 4130 steel for the weldments. Today I fired up AutoCAD and drew two of the parts required for the Elevator Horn Weldment; the Drive Plate and the Drive Arm. I don’t like the idea of cutting up my plans and while I could trace these parts I find it more interesting to draw them in AutoCAD and the plot out the templates. This is probably way more accurate than required but it works for me
Welding Preperation
In preperation for welding I have purchase some welding rod and am in the process of getting some new tips for our Oxy-Acetylene torch at work. I also need to order some new band saw blades to cut the 4130 steel. Hopefully, I’ll get these in about a weeks time and can finally get back at building.
Nose Pant Attach Brackets
I made the nose pant attach brackets

You must be logged in to post a comment.