
Tonight I worked on completing the pilot holes in the flap assembly. Next I started to transfer the holes through to the ribs. I worked on the most inboard rib first.
Flap
Continued laying out the holes in the flap skins. Completed hole layout on right hand flap skin. Drilled pilot holes in the top and bottom of the flap skin.
Flap Drive Ribs
Riveted one of the drive ribs. Layed out the position of the drive plate on the second rib. Drilled pilot holes through drive plate into drive rib. Completed drill and riveted the second flap drive rib. Started laying out rib locations on right hand flap skin.
Drilling pilot holes in Right Hand Rear Spar
Completed pilot holes in the right hand rear spar. Clean up clearance holes for control rods. Started reviewing plans for ailerons and flaps.
Drilling holes in Rear Spar
Completed drilling of pilot holes in the left hand rear spar. Started drilling pilot holes in the right hand rear spar.
Rear Wing Spars
Drilled the pilot holes for the ribs. Started to prepare for assembly of the left rear spar. Drilled the rib holes in the attach plate. Completed the pilot holes in the attach plate. Started installing the doubler.
Rear Spar Assembly
.Cut out large rectangular hole in the spar tip, -03L/R. Started to layout spars with all of the fittings in preparation for drilling. Currently I\’m puzzled by the two rivets called out between the bolts at the inboard end of each spar. I\’ll have to take a look at the group postings on yahoo.
Aileron Bellcrank Installation
Today I drilled up the holes in the #9 ribs to #30 for the mounting of the bellcranks.
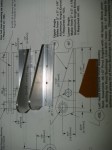
Aileron Bellcrank
I continued to increase the size of the bushing whole in the bell crank using progressively larger drills. When I got to the last one it jammed and stopped the drill. Now I finished the job with sandpaper on a dowel. A reamer would be nice about now. Using sand paper and a small round file worked okay. I managed to get the holes opened up so that the bushings would fit. Next I assembled the bellcrank in the clevis. I had to dig out my copy of AC43.13 to look up the correct torque specs and the correct method to secure the cotter pin. I seems to work pretty good. Next, on to the second assembly. I almost completed the second assembly. I just need to insert some shims to free up the rotation.
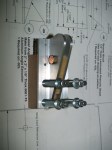

Aileron Bellcrank Installation
I picked up my phenolic at aircraft spruce in Brantford this morning. Now I can complete the bellcrank installation. I had previously traced one of the phenolic spacers and I transferred this to the phenolic then cut it out on the bandsaw. It really stinks. Probably not to good to breath. I sanded the spacer on my bench sander. Next I marked the hole for the AN3 bolt that holds the clevis assembly together. After drilling the 3/16 hole for the bolt I then colecoed the clevis to a piece of hardwood to keep the parts in alignment while drilling the rest of the holes. Before drilling the 7/16 hole for the bushing I decided to drill a trial hole in a piece of 1/8 stock. I don\’t have a reamer so I wanted to be sure that the bushings would fit okay in a drilled hole. The drilling process didn\’t work very well. I managed to get to 27/64 before I ran into problems. I started the same process with the clevis and drilled up to 1/4 before stopping for this session

You must be logged in to post a comment.