
I finished up the assembly of the left wing. Next, I need to get going on the skins and the pitot line support brackets
Fitting Root Ribs on Left Wing
Today I worked on completing the root ribs for the left wing. I worked on the rear rib first. I measured the 9/16 inch dimension from the rear spar and then fit the rib to this line. Using several .032 shims I aligned the rib with the spars and then clamped the rib to the fittings. After drilling the pilot holes I fit the reinforcement angles and pilot drilled them. Next, I added the remain holes to the reinforcement angles and transfered the holes back to the rib. The final step was to up drill, debur and rivet. For the tip rib I calculated the distance between the ribs using the skin drawing W18 and position the tip rib using the tooling hole, and the adjacent ribs. Having the spacing at the tip of the rib was helpful. The remaining steps were basically the same as for the rear rib.
Assembling Left Wing
Today I re-assembled the left wing so that I could start work on the root ribs.
Pilot Drilling Tip Ribs
I continued to install tip ribs tonight. I finished all 12 of the tip ribs leaving only the root ribs to be installed.
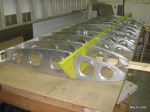
Drilling Pilot Holes for Rear Spar
I drilled all of the pilot holes for the rear spar. I then removed all of the rear ribs in preparation to install the tip ribs. I positioned the spar with the forward face down. Using my 0.032 shims I started to position each tip rib one at a time and transfer the pilot holes in the spar into the tip ribs.
Left Wing Rib Installation
I started today with a little cleanup then proceeded to work on the final straightening of all the left wing ribs. To straighten the tip ribs I used may seaming pliers and made sure that the flanges were at 90 degrees. Next, I used my fluting pliers to adjust the flues so that the ribs were straight. The final step was to mark the 1/4" centerline on the rips for the rivets. With all the ribs straightened I started to install the rear ribs. I drilled the top and bottom (outermost) pilot holes in each of the ribs as I installed them. Once all of the ribs had been installed I started to prepare the spacers. I marked the centre line on the 0.032 spacers and then drilled the pilot holes at the top and bottom of each spacer using the spar as a template. Next I marked the centre line on the 1/8 inch spacers. I installed the 1/8 spacers one at a time together with the ribs and then finished drilling the pilot holes.
Getting Ready for Second Wing Assembly
I started to dismantle the right wing so that I could assemble the left wing. After dismantling the wing I mated the two spars again and up drilled to 1/4"
Root Rib Reinforcement
I continue to prepare the root ribs today. I deburred the rivet holes in the remaining angle gussets and in the ribs themselves. Next, I riveted the ribs to the attach angles and the gussets.

Root Rib Gussets
Today I continued to work on installing the root rib gussets on the root ribs for the right hand wing.

Rib Installation
I started today by drilling the remaining pilot holes for the tip ribs. After completing the drilling I proceeded to straighten all of the tip rips. The flanges were not all 90 degrees and some of the flutes needed adjusting to make the ribs flat. After straightening all of the ribs and marking the rivet centerline I installed the tip ribs back onto the spar. The next step was to straighten all of the main ribs and attach them.


You must be logged in to post a comment.