Canopy Frame

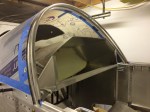
Today I worked on fitting the front canopy bow and matching it to the windshield bow strap. I ended up marking the lower portion of the canopy corner with tape to limit the insertion into the side tubes. The upper portion of the canopy corner needs to have 1/4 in showing to place the canopy bow in the correct place. The final adjustments will be made next summer or next spring when I fit the actually canopy to the frame.

CHT and EGT interfacing

For thermocouple interfacing I’m currently considering the analog devices AD849x (4,5,6,7)  series of thermocouple interfaces. Analog devices has an application note (AN-369) that is for another interface but covers how to read multiplexed thermocouples. Instead of the multiplexer listed in the application note I am considering the ADG707.  This ic will run from a single supply of 5 volts but only has a rated analog signal range to VDD (5 volts).  This limits the range of temperatures but since I will also run the AD849x on 5 volts this should not be a problem. The maximum temperature is theoretically 1000 degrees C since the output of the thermocouple interface is 5mV/°C.


Hook Rail Assembly

Today I am working on the hook rail assembly. I went back and drilled the counter sunk holes in the tube for the two bolts which connect the tube to the angle. I also had to go back and mark and drill the 3/32 inch holes in the hook angle. I made up the aft spring clip and then installed it under the handle. I used a washer under the other end of the handle. Next I put the assembly together.

Trimming the Canopy


#{1}

After my first trimming and sanding I refit the canopy to the fuselage. I lined up the centering marks and fit the rear edge down to the support blocks. The rear edge fit about 1/2 of the distance around. I decided to work on the rear edge and layout the tape for additional trimming of the rear. After taping the rear edge I used 60 grit sandpaper to sand the edge back to the tape line, finishing with 220 grit. I had to make one more adjustment to the rear edge. Next I moved on to the front edge and re-taped it for trimming. The amount to be trimmed is a bit small for the band saw and a bit big for sanding but I decided to sand anyway. Now that the front and rear fit pretty well I marked the two sides and then trimmed them using the band saw.

Trimming the canopy

After my first trimming and sanding I refit the canopy to the fuselage. I lined up the centering marks and fit the rear edge down to the support blocks. The rear edge fit about 1/2 of the distance around. I decided to work on the rear edge and layout the tape for additional trimming of the rear. After taping the rear edge I used 60 grit sandpaper to sand the edge back to the tape line, finishing with 220 grit. I had to make one more adjustment to the rear edge. Next I moved on to the front edge and re-taped it for trimming. The amount to be trimmed is a bit small for the band saw and a bit big for sanding but I decided to sand anyway. Now that the front and rear fit pretty well I marked the two sides and then trimmed them using the band saw.

Creating Tooling for Canopy Support

Today I made up support blocks (tools) to support the canopy while trimming. I saw the concept in the EAA video showing how to trim a sonex canopy. I used the original patter than I used for the turtle deck. I traced two blocks onto a piece of MDF. After trimming the blocks on the bandsaw, I worked on the profile which changes from the bottom to the top.