
Today I worked on the tip ribs. I had previously removed the leading edge skin. First, with the ribs attached, I up drilled the #40 holes to #33 on the top flange. Next I used my modified dimple dies in my squeezed to dimple the holes. Afterwards I started removing the ribs one at a time and up drilling the remaining holes on the bottom flange and dimpling them.
More Fasteners for the Wing Tip
Today I am working on the fasteners at the trailing edge of the wing tip. I plan to install three nut plates. I made up another strip of 1/16" by 5/16" al and proceeded to drill and countersink for the nutplates and countersunk screws at the trailing edge. The last think I need to do is create a fastener at the leading edge.
New Wing Tip Attach Angle
The wing tip attach angles I made earlier do not seem to fit properly so I’ll make some new ones today so that I can finish the wing tips for the left wing. After making and fitting the new attach angle to the wing tip I proceeded to drill the pilot holes for the counter sunk screws I plan to use. Next I started to make the spacer for the nut plates. With the spacers made I installed the nut plates on the angle. I dimpled for the screws using a countersunk solid rivet just as I did the main spars. This worked well and I installed the wing tip again, this time using screws. The last step is to make an angle for the leading edge to capture the wing tip.

Wing Tips
Wing Tips
I finished the last angle today and started to fasten all of the angles to the wing skins. Next, I need to cutout the wing tip.
Wing Tip Angles
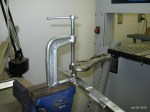
Today I continued working on installing the nut plates in the wing tip angles. One of the tricky tasks was to dimple the angles for the countersunk rivets and the countersunk screws I would be using. I have a hand squeezer and dimple dies but due to the sharp bend in the angles (approximately 45 degrees) the squeezer would not work. I decided to try using a regular c-clamp as a squeezer with the bottom die being the countersunk spacer and then use the top dimple die to push the counter sink down into the spacer. I removed the swivel from the threaded portion of the c-clamp and then removed the threaded piece from the c frame. Next, I used a long drill to drill out a 1/8 inch hole in the foot of the c-clamp. I kept the hole towards the outside of the c-clamp so that I would be able to get quite close the the bend in the angle. With the c-clamp modified I was able to start the dimpling operation. I used a small 1/4 inch socket as a spacer around the post of the dimple die so that I was exerting a force on the larger part of the die. This process worked well and I was also able to dimple the larger hole for the #6 screw. This dimple wasn’t really deep enough but installing the screw finished the dimple. I managed to get three angles almost complete. I have one nut plate to install in the third angle and then the last angle to finish. Tonight I finished the third angle and started on the last one.


Wing Tips
Today I am working on installing the nut plates in the angles I have made. The first step was to open up the holes for the screws to #30. I then removed the angles from the wing skin. In order to install the nut plates I needed a spacer made from 0.062 in. 6061-T6 sheet. I cut strips 5/16 in. wide and then proceeded to mark them for the holes for the nut plates. The strips will be countersunk on one side to allow the rivets and the screws to be flush on the outside.


Working On Wing Tips
Wing Tip
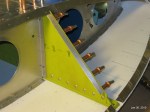
I continued working on the left wing tip today. I worked the flutes a bit to improve the fit of the 45 degree flange and then transfered the pilot holes from the top skin to the flange. I plan to keep the tip skin a bit short on the top side so that the radius is visible. I think this will provide the cleanest look.
Wing Tip
I’ve been working on my wing tips for a little while now. At first I wanted to make a one piece wing tip out of aluminum and I started this by creating a cardboard template of the wing tip opening. I decided that a one piece tip would be rather difficult and I was especially worried about forming the flanges. After looking at some other plans that I have (Zodiac XL) I decided to form the flanges as separate angles. These will have nut plates installed so they can be screwed to the wing skins and then I will rivet a single flat sheet of aluminum to the angles to form the wing tip. So far I’ve made up three of the angles and pilot drilled two of them.

You must be logged in to post a comment.