
I drilled all of the pilot holes for the rear spar. I then removed all of the rear ribs in preparation to install the tip ribs. I positioned the spar with the forward face down. Using my 0.032 shims I started to position each tip rib one at a time and transfer the pilot holes in the spar into the tip ribs.
Left Wing Rib Installation
I started today with a little cleanup then proceeded to work on the final straightening of all the left wing ribs. To straighten the tip ribs I used may seaming pliers and made sure that the flanges were at 90 degrees. Next, I used my fluting pliers to adjust the flues so that the ribs were straight. The final step was to mark the 1/4" centerline on the rips for the rivets. With all the ribs straightened I started to install the rear ribs. I drilled the top and bottom (outermost) pilot holes in each of the ribs as I installed them. Once all of the ribs had been installed I started to prepare the spacers. I marked the centre line on the 0.032 spacers and then drilled the pilot holes at the top and bottom of each spacer using the spar as a template. Next I marked the centre line on the 1/8 inch spacers. I installed the 1/8 spacers one at a time together with the ribs and then finished drilling the pilot holes.
Getting Ready for Second Wing Assembly
I started to dismantle the right wing so that I could assemble the left wing. After dismantling the wing I mated the two spars again and up drilled to 1/4"
Root Rib Reinforcement
I continue to prepare the root ribs today. I deburred the rivet holes in the remaining angle gussets and in the ribs themselves. Next, I riveted the ribs to the attach angles and the gussets.

Root Rib Gussets
Today I continued to work on installing the root rib gussets on the root ribs for the right hand wing.

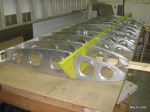
Rib Installation
I started today by drilling the remaining pilot holes for the tip ribs. After completing the drilling I proceeded to straighten all of the tip rips. The flanges were not all 90 degrees and some of the flutes needed adjusting to make the ribs flat. After straightening all of the ribs and marking the rivet centerline I installed the tip ribs back onto the spar. The next step was to straighten all of the main ribs and attach them.


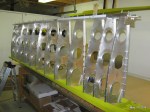
Wing Rib Installation
Today I started on the wing rib installation. I began by finding all of the ribs for the right hand wing. I then put the spar on top of two 2x4s that I had screwed to the bench with the forward side up. One by one, I located the ribs and then drilled the pilot holes top and bottom. Next, I marked the centerline on each of the .032 spacers and then drilled the pilot holes in them. Following the .032 spacers were .125 spacers. After drilling all of the pilot holes I turned the spar over and marked the center line for the rivets on the end of each rib. Then I pilot drilled the ribs using the rear spar.

Finising Up The Spars
Today I worked on the spars again. I was cleaning up the minor scratches from assembly, torquing all of the fasteners, and generally getting things ready for the assembly of the wings. I completed all of the last riveting and assembly. The only thing left is the final up drilling to 1/4 inch which I need to do when the weather will allow me to extend the spars outside the garage again.

Mating Left and Right Wing Spars
I completed drilling the 3/16 inch hole through each of the wing attach points using the 3/16 hole in the attach blocks as adrill bushing. I had not up drilled the spar web earlier. After up drilling the attach points I married the spars for the first time. All of the holes lined up very well. I up drilled the three remaining holes to #30 then to #21. Finally I up drilled the center hole to 3/16 of an inch. I decide to take things apart at this point to check things out. All looked good so I decided to up drill the remaining two holes to 3/16.

You must be logged in to post a comment.