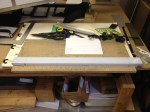
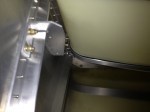
I finished removing the glare shield today then proceeded to work on the rudder pedal installation. I dug out my phenolic blocks and then discovered I need to order the necessary bolts. Next, I proceeded to remove the powder coat from the bearing surfaces. I reviewed the EAA home builders video where John uses a propane torch to heat up the paint and a wire brush to remove it. I tried masking the edges of the area but found this to be less than satisfactory. The tape only burns and turns into a gooey mess.
Fuel Tank
Today I started preparing my fuel tank. I followed the instruction sheet provided by Sonex. First I ran the required drill bits into the holes then I used the NPT taps to clean up the threads. The taps don’t appear to go all the way to the bottom of the thread or touch the plastic. After cleaning up the gas tank I though about ways to clean out the tank. I’ll have to think about this again closer to installing the tank. I next started to work on the glare shield by upsizing and dimpling the holes joining the two pieces of my custom glare shield.
Instrument Panel Cross Tie
Today I worked on making the Instrument Panel Cross Tie. My cross tie has an offset of 1-1/2 inches. This is to provide a full 11-1/2 inches behind the lower portion of the panel to allow for standard radios.
Fitting Glare Shield
I trimmed the glare .shield to allow for the new/revised shape to be fit above the instrument panel. Next I started work on the fuel tank stop angles. These will be longer and will include an upper stop as one flange will be extended to connect to the glare shield that is located above the instrument panel. I extended the 3/4 inch flange by another 3/4 inch to allow fastening to the second half of the glare shield. After bending two angles I refit the glare shield to the fuselage to determine where the angles needed to be positioned prior to drilling the rivet pilot holes. These will be flush rivets. Next, I cut and bent the top angle. I left a cutout in the top angle for the fuel sight gauge fitting. I will need to trim the corners of the top angle so it doesn’t interfere with the side angles. A trial fitting appears to indicate that I need to put the rivet holes 1/2 in from the edge of the shortened standard glare shield. This will put the hoes close to 1/4 inch from the bend in the stop angle which is the plans dimension but will also allow me to keep the rivets in alignment with the join between the two glare shield pieces allowing for a better look.
Fitting Gas Tank
Today I worked on getting the fuel tank straps to fit correctly.
Forward Fuselage Spar Tunnel
Wing Rigging
Rigged the wings today with some help from my son.
Aft Lower Cabin
I started today by deburring all of the parts for the aft lower cabin. Next, I clecoed the parts in place. I moved the plane out doors so that I could flip it over and rivet from the bottom. Then I flipped it once again and completed the rivets inside the cabin. Finally, I moved the plane back inside.


You must be logged in to post a comment.