
Pilot Drilling the Right Bottom Wing Skin
I started off by setting up the wing level on the bench. Actually, the important part was to make sure the main and rear spars where in alignment at both ends. I used a block of aluminum and some tape to mark the level. Once the wing was level, I rechecked the position of the two spar holes. With everything in alignment I proceeded to fit the bottom skin. The tough part was figuring out just how far in or out to place the wing. Once I completed all of the pilot holes in the bottom skin I used my cargo straps to pull the leading edge skin into place. Next, I started to drill the pilot holes in the leading edge skin. I drilled all of the holes in the leading edge except for the holes that go through the main spar.


Drilling Pilot Holes in the Top of the Main Spar
Pilot Drilling the Right Leading Edge Skin
I moved the wing forward on my bench so that the leading edge skin could hang over the front without getting caught on my wing support blocks. I then leveled the wing using some aluminum scrap as shims and proceeded to position the leading edge skin.
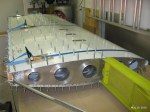
Pilot Drilling the Right Top Wing Skin
Today I completed all of the #40 holes through the top skin and ribs. Next I need to drill through the rear spar and the main spar. For that process I plan to lay the wing flat and check the twist again with a level. I drilled the #40 holes through the rear spar and then leveled the wing on the bench in preparation for fitting the leading edge skin. Next, I got down the leading edge and started on the fitup.
Preparing Right Wing for Skinning
I setup the right wing on my bench and set the distance between the rear spar attach hole and the center of the fuselage to 19". Next I unrolled the top skin and proceeded to align the skin.
Riveting the Tip Skin
Today I riveted the top skin and the top of the leading edge skin to my left wing.

You must be logged in to post a comment.